> ## Documentation Index
> Fetch the complete documentation index at: https://docs.routerlink.ai/llms.txt
> Use this file to discover all available pages before exploring further.
# OpenCode
> 本文档仅供参考,演示如何配置我们的 API 与第三方 AI 聊天界面配合使用。文中提及的任何第三方软件、网站或服务均非由我们运营、控制或背书。
# **OpenCode 简介**
 [OpenCode](https://opencode.ai/) 是一款开源 AI 编程智能体,提供基于终端的界面、桌面应用和 IDE 扩展三种形式。**OpenCode** 核心特性:
* 本地优先,注重隐私
* 支持 75+ 种 AI 模型
* 基于终端的交互式 UI
* 代码生成、调试与重构
* 插件与工具集成(MCP)
* 编程与规划的智能体模式
* 多会话支持
* LSP 驱动的代码智能
* 高度可定制与可扩展
* 支持 Shell 和文件操作自动化
# **步骤**
> **Windows** 用户可能出现因为数字签名而无法运行脚本的问题,请运行如下命令:
>
> ```powershell theme={null}
> Set-ExecutionPolicy -Scope CurrentUser -ExecutionPolicy RemoteSigned -Force
> ```
安装 [最新 LTS 版本的 Node.js](https://nodejs.org/en/download/),安装完成后,打开终端(Windows 用户使用 PowerShell)并检查版本号。
* macOS、Linux、Windows:
```shellscript theme={null}
npm install -g opencode-ai
```
> **Windows** 用户可能出现因为缺少 VC 运行库而无法运行的问题,请下载并安装[此软件](https://aka.ms/vs/17/release/vc_redist.x64.exe)。
在修改配置文件之前,您需要在本地密钥管理器中注册一个提供商别名(Provider ID)。此步骤确保 API Key 的安全存储,防止其以明文形式硬编码在配置文件中。执行认证命令:
```shellscript theme={null}
opencode auth login
```
选择类型:在列表底部找到并选择"other"(可直接输入搜索)。
\
定义 ID:输入"local"。
输入 Key:填入您从 [RouterLink](https://routerlink.ai/settings/api-keys) 创建的令牌 API Key(sk-xxxx)。
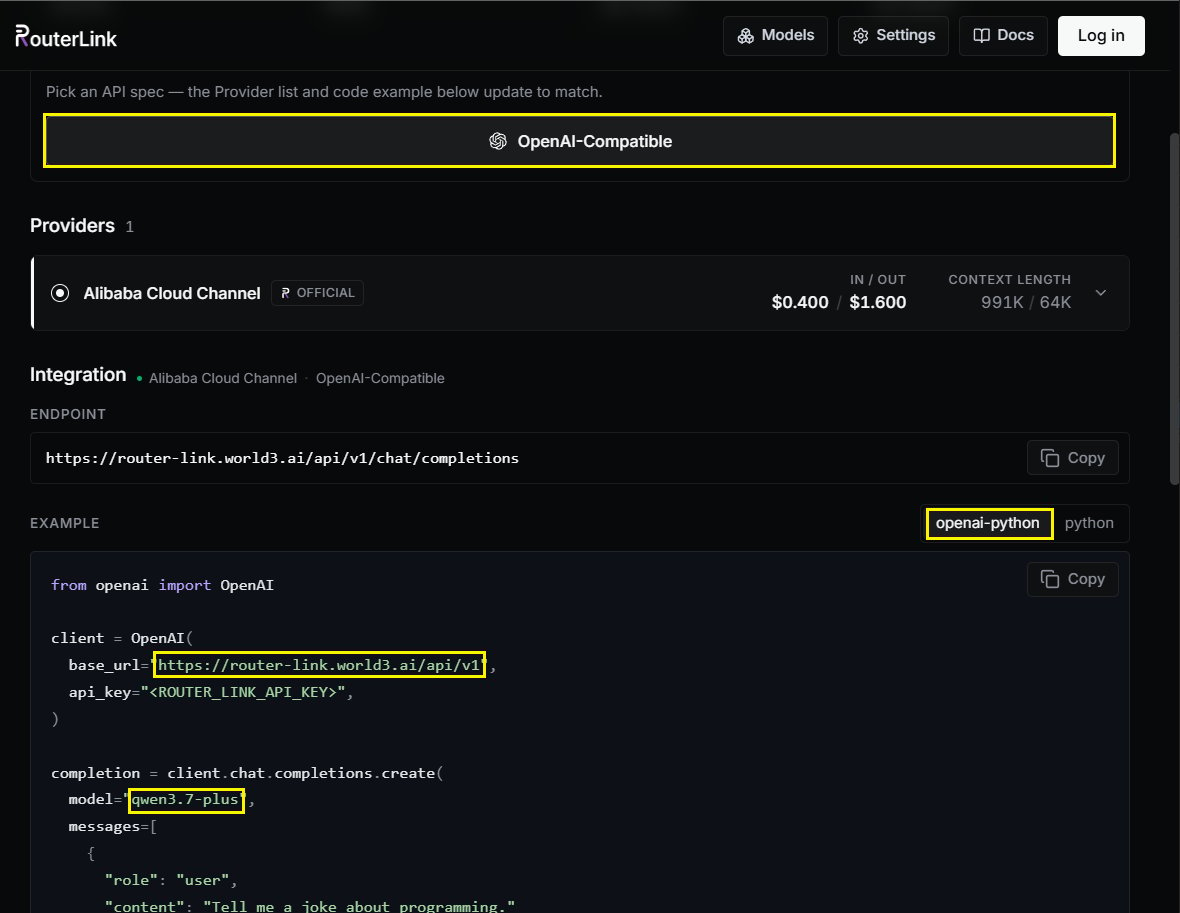
OpenCode 使用 `opencode.json` 文件解析提供商参数。请根据您的操作系统找到并创建/编辑该文件。
编辑或创建 `opencode.json` 文件
macOS 和 Linux:`~/.config/opencode/opencode.json`
Windows:`C:\Users\\.config\opencode\opencode.json`
配置文件:
```json theme={null}
{
"$schema": "https://opencode.ai/config.json",
"provider": {
"local": {
"npm": "@ai-sdk/openai-compatible",
"name": "local",
"options": {
"baseURL": "https://router-link.world3.ai/api/v1"
},
"models": {
"gpt-5.5": {
"name": "gpt-5.5"
},
"gemini-3.1-pro-preview": {
"name": "gemini-3.1-pro-preview"
},
"claude-opus-4.7": {
"name": "claude-opus-4.7"
}
}
}
}
}
```
npm:使用 `@ai-sdk/openai-compatible` 适配 OpenAI 兼容协议。
baseURL:填入 RouterLink 平台的 API 端点。
models:需要手动声明支持 OpenAI 兼容协议的[模型](https://routerlink.ai/models)列表。Key 必须与实际的 Model ID 对应。
[OpenCode](https://opencode.ai/) 是一款开源 AI 编程智能体,提供基于终端的界面、桌面应用和 IDE 扩展三种形式。**OpenCode** 核心特性:
* 本地优先,注重隐私
* 支持 75+ 种 AI 模型
* 基于终端的交互式 UI
* 代码生成、调试与重构
* 插件与工具集成(MCP)
* 编程与规划的智能体模式
* 多会话支持
* LSP 驱动的代码智能
* 高度可定制与可扩展
* 支持 Shell 和文件操作自动化
# **步骤**
> **Windows** 用户可能出现因为数字签名而无法运行脚本的问题,请运行如下命令:
>
> ```powershell theme={null}
> Set-ExecutionPolicy -Scope CurrentUser -ExecutionPolicy RemoteSigned -Force
> ```
安装 [最新 LTS 版本的 Node.js](https://nodejs.org/en/download/),安装完成后,打开终端(Windows 用户使用 PowerShell)并检查版本号。
* macOS、Linux、Windows:
```shellscript theme={null}
npm install -g opencode-ai
```
> **Windows** 用户可能出现因为缺少 VC 运行库而无法运行的问题,请下载并安装[此软件](https://aka.ms/vs/17/release/vc_redist.x64.exe)。
在修改配置文件之前,您需要在本地密钥管理器中注册一个提供商别名(Provider ID)。此步骤确保 API Key 的安全存储,防止其以明文形式硬编码在配置文件中。执行认证命令:
```shellscript theme={null}
opencode auth login
```
选择类型:在列表底部找到并选择"other"(可直接输入搜索)。
\
定义 ID:输入"local"。
输入 Key:填入您从 [RouterLink](https://routerlink.ai/settings/api-keys) 创建的令牌 API Key(sk-xxxx)。
OpenCode 使用 `opencode.json` 文件解析提供商参数。请根据您的操作系统找到并创建/编辑该文件。
编辑或创建 `opencode.json` 文件
macOS 和 Linux:`~/.config/opencode/opencode.json`
Windows:`C:\Users\\.config\opencode\opencode.json`
配置文件:
```json theme={null}
{
"$schema": "https://opencode.ai/config.json",
"provider": {
"local": {
"npm": "@ai-sdk/openai-compatible",
"name": "local",
"options": {
"baseURL": "https://router-link.world3.ai/api/v1"
},
"models": {
"gpt-5.5": {
"name": "gpt-5.5"
},
"gemini-3.1-pro-preview": {
"name": "gemini-3.1-pro-preview"
},
"claude-opus-4.7": {
"name": "claude-opus-4.7"
}
}
}
}
}
```
npm:使用 `@ai-sdk/openai-compatible` 适配 OpenAI 兼容协议。
baseURL:填入 RouterLink 平台的 API 端点。
models:需要手动声明支持 OpenAI 兼容协议的[模型](https://routerlink.ai/models)列表。Key 必须与实际的 Model ID 对应。
 启动主程序:
```shellscript theme={null}
opencode
```
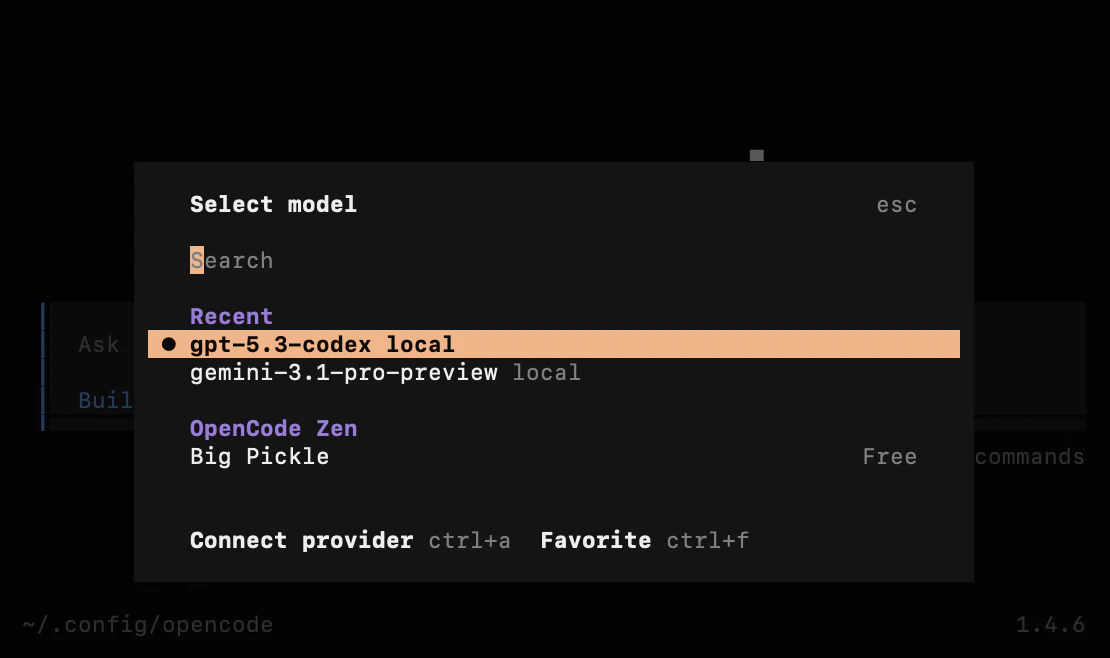
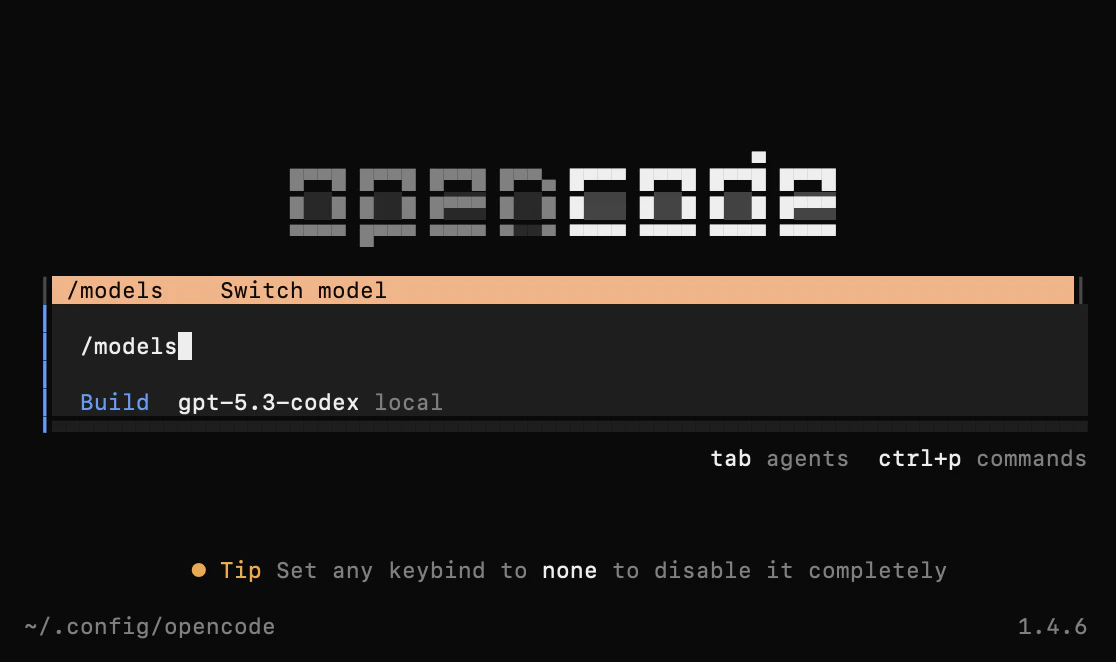
在交互式提示中输入以下命令打开模型菜单:`/models`
启动主程序:
```shellscript theme={null}
opencode
```
在交互式提示中输入以下命令打开模型菜单:`/models`
 如果配置正确,您将看到其模型列表。